If you want to learn embroidery in a fun and simple way, this punch needle tutorial step-by-step guide is perfect for you.
Punch needle embroidery is one of the easiest fiber crafts to learn. With only a few tools and simple techniques, you can create beautiful textured designs such as wall art, rugs, pillows, and decorative pieces.
In this beginner-friendly guide, you will learn:
- What punch needle embroidery is
- Tools and materials you need
- A complete punch needle tutorial step-by-step
- Common mistakes beginners make
- Easy punch needle project ideas
By the end of this tutorial, you will be ready to start your first punch needle project with confidence.
What Is Punch Needle Embroidery?
Punch needle embroidery is a textile craft that uses a special hollow needle to push yarn through fabric and create loops.
Unlike traditional embroidery, where thread is pulled through fabric, punch needle creates raised loops on the front side of the fabric.
These loops form a soft texture that looks similar to a small rug.
Punch needle can be used to create:
- Wall decorations
- Pillows
- Rugs
- Tote bags
- Coasters
Because it is easy to learn, many beginners love this craft.
Why Punch Needle Is Perfect for Beginners
Punch needle embroidery has become very popular in recent years.
Here are some reasons why beginners love it.
Easy to Learn
Most people can learn the basics of punch needle in less than an hour.
Fast Results
Punch needle projects grow quickly because yarn covers large areas of fabric.
Relaxing Hobby
The repetitive punching motion makes it calming and enjoyable.
Creative Designs
You can create many designs including:
- Flowers
- Geometric patterns
- Animals
- Abstract art
This makes punch needle perfect for creative people.
Essential Tools for Punch Needle
Before starting this punch needle tutorial step-by-step, you need a few basic tools.
Here are the most important materials.
| Tool | Purpose |
| Punch needle tool | Used to push yarn through fabric |
| Embroidery hoop | Keeps fabric tight |
| Yarn | Creates loops and texture |
| Fabric | Holds the stitches |
| Needle threader | Helps insert yarn into needle |
These tools are affordable and easy to find.
For beginners, a punch needle starter kit can also be helpful.
Best Fabric for Punch Needle
Not every fabric works well for punch needle embroidery.
The fabric must have open spaces between threads so the needle can pass through easily.
The best fabrics include:
- Monk’s cloth
- Weaver’s cloth
- Linen
- Rug warp fabric
Among these, monk’s cloth is the most popular for beginners.
Choosing the Right Yarn
The yarn you choose affects the final look of your punch needle design.
Common yarn options include:
Wool Yarn
Soft and durable. Perfect for most projects.
Cotton Yarn
Lightweight and good for small designs.
Acrylic Yarn
Affordable and easy to find.
Bulky Yarn
Creates thicker and more textured loops.
Beginners usually start with medium-weight yarn.
How to Prepare Your Punch Needle Materials
Before starting the punch needle tutorial step-by-step, you should prepare your materials correctly.
Preparation makes the stitching process much easier.
Follow these simple steps:
- Choose a simple design pattern
- Stretch fabric on an embroidery hoop
- Thread the punch needle
- Prepare your yarn colors
Once your materials are ready, you can begin stitching.
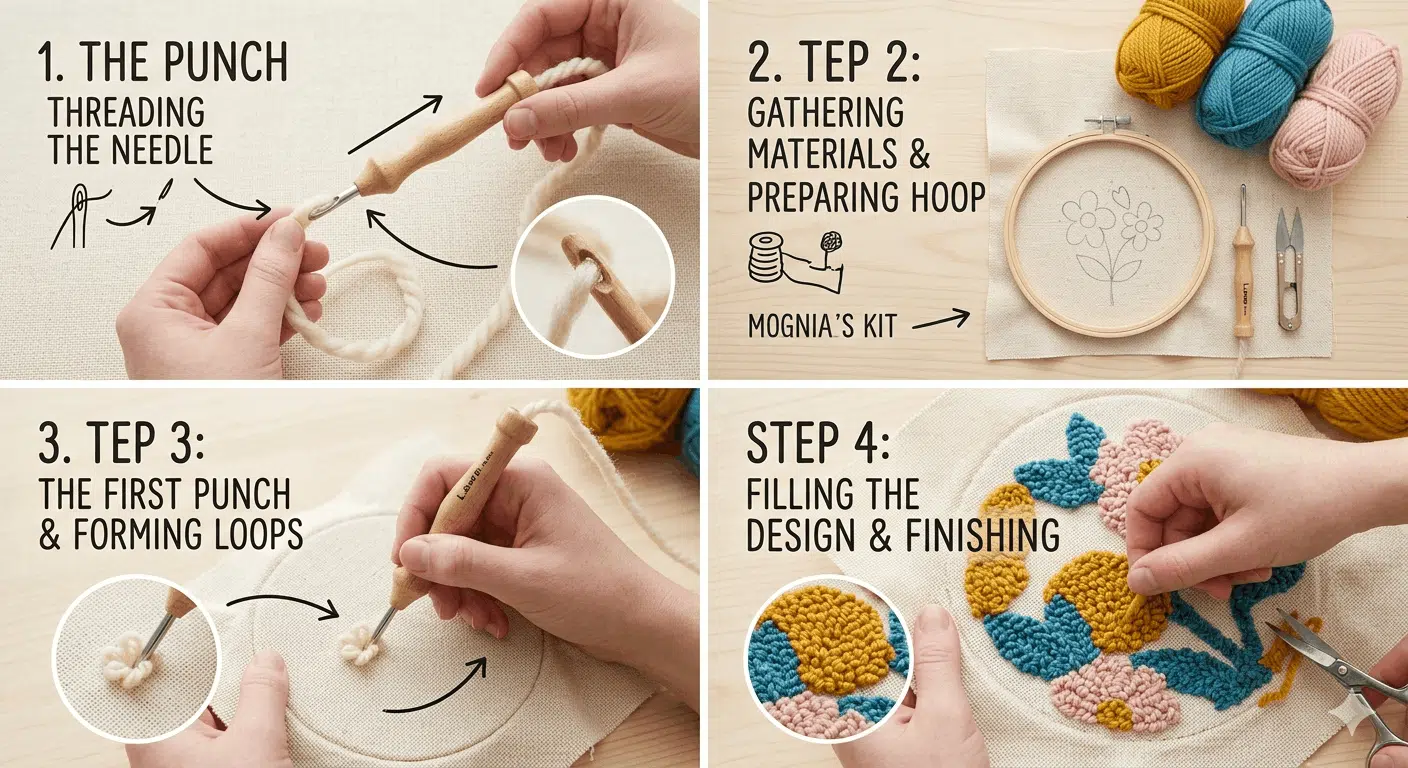
Punch Needle Tutorial Step-by-Step
Now let’s start the main punch needle tutorial step-by-step.
Follow these easy steps to create your first punch needle embroidery design.
Step 1: Thread the Punch Needle
Use a needle threader to guide the yarn through the punch needle.
Steps:
- Insert threader through the needle
- Place yarn in the threader
- Pull the threader back through the needle
The yarn should come out of the needle tip.
Step 2: Insert Yarn Through the Needle Eye
Most punch needles have a small hole near the tip.
Pass the yarn through this hole to complete threading.
Step 3: Stretch the Fabric Tightly
Place the fabric inside an embroidery hoop and tighten it.
The fabric should feel tight like a drum.
Loose fabric can cause stitches to fall out.
Step 4: Transfer Your Pattern
Draw your design on the fabric using a marker or tracing method.
Simple designs work best for beginners.
Examples:
- Hearts
- Flowers
- Circles
- Letters
Step 5: Hold the Needle Correctly
The needle opening should face the direction you are stitching.
This helps the yarn move smoothly through the fabric.
Step 6: Start Punching the Needle
Push the needle straight into the fabric until the handle touches the surface.
Then pull the needle up slightly and move to the next stitch.
Important tip:
Do not pull the needle completely out of the fabric.
Step 7: Follow Your Pattern Lines
Punch stitches along the outline of your design first.
This helps create clear shapes.
Step 8: Keep the Needle Vertical
Always hold the punch needle straight up and down.
Tilting the needle may cause uneven stitches.
Step 9: Keep Stitches Close Together
Close stitches create a fuller and softer design.
If stitches are too far apart, gaps may appear.
Step 10: Fill the Inside of the Design
After finishing the outline, fill the inside area with rows of stitches.
You can work in:
- Straight rows
- Spiral patterns
- Back-and-forth lines
Step 11: Change Yarn Colors
To switch colors:
- Cut the current yarn
- Thread the new color
- Continue punching stitches
This helps create colorful designs.
Step 12: Check the Front Side
Flip your embroidery hoop occasionally.
You will see soft loops forming on the front side.
These loops create the textured look.
Step 13: Fix Loose Loops
If a loop comes out, simply punch the stitch again.
You can also push loops back into place using your fingers.
Step 14: Secure the Back of the Fabric
Once your design is finished, apply fabric glue to the back.
This helps keep stitches secure.
Step 15: Finish Your Punch Needle Project
After the glue dries, your project is ready to display.
You can turn it into:
- Wall art
- A pillow cover
- A decorative patch
- A coaster
Congratulations! You have completed your punch needle tutorial step-by-step project.
Common Punch Needle Mistakes Beginners Make
Many beginners make a few common mistakes.
Fabric Not Tight Enough
Loose fabric causes loops to fall out.
Always stretch fabric tightly.
Using the Wrong Fabric
Thin fabrics cannot hold punch needle stitches.
Choose monk’s cloth or similar fabric.
Pulling the Needle Too High
If the needle leaves the fabric completely, stitches may unravel.
Easy Punch Needle Project Ideas for Beginners
Once you learn the basics, try these beginner projects.
Simple Projects
- Coasters
- Keychains
- Small wall art
- Bookmarks
Medium Projects
- Pillow covers
- Tote bags
- Decorative patches
Advanced Projects
- Rugs
- Large wall hangings
- Portrait designs
Practicing different projects will improve your punch needle skills.
FAQs About Punch Needle Tutorial Step-by-Step
Is punch needle embroidery easy to learn?
Yes. Punch needle embroidery is one of the easiest crafts for beginners.
What fabric is best for punch needle?
Monk’s cloth is the best fabric for beginners because it holds stitches well.
Why are my punch needle loops falling out?
This usually happens when the fabric is loose or the wrong fabric is used.
Can I use regular yarn for punch needle?
Yes. Medium-weight yarn works well with most punch needles.
How long does a punch needle project take?
Small projects can take 1–2 hours, while larger designs may take several days.
Do punch needle projects need glue?
Yes. Adding glue or backing helps secure stitches and protect your design.
Conclusion
Learning punch needle embroidery is simple and enjoyable. With this punch needle tutorial step-by-step, beginners can easily understand the tools, materials, and techniques needed to create beautiful handmade designs.
Start with small projects, practice regularly, and soon you will be able to create amazing punch needle artwork for your home or gifts.
Punch needle is not only a creative hobby but also a relaxing activity that anyone can enjoy.